
Skip to Content
chevron-left chevron-right chevron-up chevron-right chevron-left arrow-back star phone quote checkbox-checked search wrench info shield play connection mobile coin-dollar spoon-knife ticket pushpin location gift fire feed bubbles home heart calendar price-tag credit-card clock envelop facebook instagram twitter youtube pinterest yelp google reddit linkedin envelope bbb pinterest homeadvisor angies

Top Tile Leveling Spacers for Professional Tile Installation

Professional tile installation depends on more than careful adhesive spreading and attractive tile selection. Even a skilled installer can face uneven edges, shifting tiles, or narrow grout joints during a demanding project. Tile Leveling Spacers help control these problems by holding adjacent tiles at a consistent height while the adhesive cures.

The best systems should match the tile format, thickness, layout, and working conditions. Large porcelain tiles may need stronger clips and wedges, while smaller ceramic tiles often require a lighter solution. Reusable caps, smooth adjustment, and clean clip removal also affect daily efficiency. Small details matter.

This guide examines top Tile Leveling Spacers for professional tile installation. It considers grip strength, joint accuracy, material quality, comfort, and removal performance. Practical experience matters here. A spacer that looks excellent online may feel awkward after several hours of kneeling and tightening. That deserves attention.

The discussion also recognizes real installation limits. No leveling system can correct a badly prepared substrate or excessive adhesive variation. Better results begin with a flat surface, consistent mortar coverage, and proper movement joints. Measurements still matter.

Expect useful comparisons, not exaggerated promises. Some products may perform well on walls but poorly with heavy floor tiles. Others can save time, yet leave fragments if removed carelessly. The right choice depends on the project, the installer’s technique, and the tile manufacturer’s guidance. Careful judgment remains essential.
Top Tile Leveling Spacers for Professional Tile Installation

What Are Tile Leveling Spacers and How Do They Work?

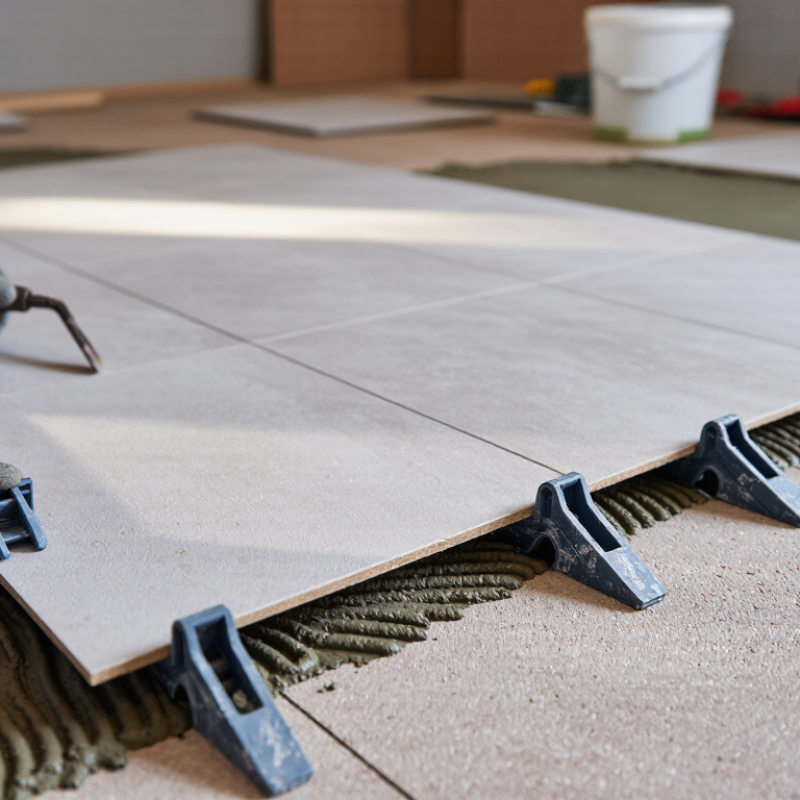
Tile leveling spacers are small clips, wedges, or rotating caps that help adjacent tiles stay aligned. They reduce height differences between tile edges, commonly called lippage. A clip sits beneath or between tiles, while a wedge applies controlled pressure across the joint. As the adhesive cures, the system limits movement caused by uneven bedding or tile warpage.

Their purpose is practical, not cosmetic. ANSI A108.02 requires grout joints to accommodate actual tile-size variation, with the joint typically measuring at least three times the tile’s facial variation. The 2024 TCNA Handbook also emphasizes proper mortar coverage and substrate preparation.

Leveling spacers cannot correct a badly uneven floor. That mistake is still mine to fix.

On site, I press each tile into the mortar before inserting the clip. Excess adhesive around the joint can distort the spacing. I then tighten the wedge until the surfaces feel flush, without crushing the tile corners. The system should match the tile thickness and joint width. Some installations still need traditional spacers, especially near walls, corners, and pattern changes. A 2023 industry training report from the National Tile Contractors Association stresses that layout, coverage, and movement joints remain essential quality controls. Leveling hardware improves consistency, but it does not replace experienced hands. Occasionally, I remove a clip and reset the tile. Slower, but safer.

Key Types of Tile Leveling Spacers for Professional Use

Top Tile Leveling Spacers for Professional Tile Installation

Professional tile work depends on more than straight grout lines. The right leveling spacer controls height, joint width, and surface alignment while adhesive cures. Clip-and-wedge systems are widely used for porcelain and large-format tiles. A thin clip sits beneath adjoining tiles, while a wedge applies downward pressure. They work quickly on floors and walls, but excessive force can lift one tile or squeeze out adhesive.

Screw-cap systems offer more controlled pressure. Their threaded cap tightens gradually, which helps installers correct uneven tile edges without sudden movement. They suit thicker tiles and demanding wall installations. However, caps require more handling time, and dirty threads may reduce accuracy. Keep them clean. Small details matter.

Cross-shaped and T-shaped spacers remain useful when joint width must stay consistent. Some leveling clips combine both functions, reducing the number of tools on the job. Choose clip thickness according to the planned grout joint, not personal habit. The substrate must also be flat; spacers cannot repair major dips. I have seen installers blame the leveling system when the real problem was uneven adhesive coverage. Check coverage with a straightedge and lift a tile occasionally for inspection. Remove clips in the manufacturer’s recommended direction after the adhesive firms up, never by striking them randomly. Broken plastic can leave pieces under grout lines. That mistake is easy to make.

How to Choose the Right Tile Leveling Spacer System

Choosing the Right Tile Leveling Spacer System

A tile leveling spacer system should match the tile, joint width, and installation surface. Large-format porcelain needs stronger clips and a stable wedge or cap. Small ceramic tile may need a lighter system.

The Tile Council of North America’s 2023 U.S. Ceramic Tile Market report recorded more than 3 billion square feet of tile consumption.

That volume reflects a demanding installation environment, not a reason to choose the cheapest spacer.

Check the required joint size first. A 2 mm spacer cannot create a wider joint without stressing tile edges. Measure tile thickness variation, too. In practice, clips with a smooth release reduce chipping during removal. Reusable caps can lower waste, although they are easy to misplace on busy sites.

The system also cannot correct a badly uneven substrate. That mistake is common. Follow the adhesive manufacturer’s coverage guidance and verify the floor with a straightedge before spreading mortar. ANSI A108.02 also emphasizes proper substrate preparation and consistent joint alignment.

Tips: Use a spacer system that matches the joint width exactly. Press tiles into mortar, then adjust gently. Remove clips in the recommended direction after curing. Wear eye protection during removal. Test one small area first. I still measure the first three rows twice; rushing there often creates a visible pattern error. Keep extra clips available, because broken pieces and uneven tile edges can change daily usage. Review technical sheets from the Tile Council of North America and ANSI before starting, especially for exterior or wet-area work.

Step-by-Step Guide to Using Tile Leveling Spacers

For professional tile installation, tile leveling spacers work best when the surface is flat, clean, and sound. Check the substrate with a straightedge, then remove dust and high spots before spreading adhesive. Choose a spacer width that matches the planned grout joint. Dry-lay several tiles around walls, corners, and drains to confirm the layout. Small errors become obvious later. Measure twice.

Spread enough adhesive for a manageable area, using the trowel’s notched side consistently. Press each tile firmly, then slide a clip beneath adjoining edges. Insert the wedge into the clip and tighten it by hand until the surfaces align. Do not force the wedge; excessive pressure can lift tiles or squeeze out too much adhesive. Check the plane with a straightedge and inspect the joint width from several angles. Adjust tiles while the adhesive remains workable. Keep moving.

Allow the adhesive to cure according to its technical instructions before removing the system. Kick or tap clips parallel to the grout line, rather than pulling them upward. This reduces the chance of disturbing the tile or leaving plastic under the grout. Clean squeezed adhesive from joints before it hardens, because cured residue narrows the grout space. In my experience, leveling spacers improve consistency, but they cannot correct a weak substrate or uneven adhesive coverage. I once trusted the clips too much and missed a low corner; the correction took longer than careful preparation. That mistake still guides my inspections.

Common Installation Mistakes and Best Practices

Top Tile Leveling Spacers for Professional Tile Installation

Tile leveling spacers can reduce lippage, but they cannot correct a poor substrate. The Tile Council of North America (TCNA) Handbook recommends checking surface flatness before setting tile. Large-format tile usually requires tighter tolerances than small tile. A two-metre straightedge can reveal dips that look invisible under normal lighting. Clean the surface, repair low areas, and confirm the mortar suits the tile and substrate.

Common mistakes include uneven mortar coverage, misaligned clips, and removing spacers too late. Installers sometimes tighten clips aggressively. That can squeeze out mortar and create hollow areas beneath the tile. ANSI A108.02 also emphasizes proper coverage and movement accommodation. A 2024 Houzz & Home Study reported a median renovation spend of $55,000 for major projects, making preventable tile repairs especially costly. The figure is not tile-specific, but it shows why installation control matters.

Tips: Use spacers that match the joint width, not the tile thickness. Comb mortar in one direction. Back-butter larger tiles when required. Lift a tile occasionally and inspect coverage. Remove clips only after the mortar reaches its stated working strength. Keep movement joints clear of grout. Wipe squeeze-out immediately. Check alignment from several angles, especially beside doorways and long walls. Even experienced installers miss a corner. Slow down there. A leveling system improves consistency, but it does not replace layout planning, movement joints, or careful workmanship.

Top Tile Leveling Spacers for Professional Tile Installation - Common Installation Mistakes and Best Practices

Installation Dimension Recommended Practice Common Mistake Potential Result Professional Check
Spacer size and grout joint Select the spacer width to match the specified grout joint and the tile manufacturer's requirements. Common residential joints include approximately 2 mm, 3 mm, and 6 mm. Choosing a spacer only because it is included in a kit, without checking the design specification. Inconsistent joint width, poor visual alignment, or insufficient room for grout. Measure several joints with a joint gauge or ruler before the mortar sets.
Tile format Use leveling spacers when large-format, rectangular, or lightly warped tiles require help maintaining a flush surface. Assuming a leveling system can correct severely bowed tiles or an uneven substrate. Lippage remains visible and the clips may be overloaded or difficult to remove. Dry-lay several tiles and check flatness before installation.
Substrate flatness Correct significant high and low areas before tiling. A leveling system is intended to align adjacent tiles, not replace substrate preparation. Applying extra adhesive only under isolated tiles to compensate for an uneven floor or wall. Uneven bonding, hollow spots, cracked grout, or tile movement. Use a straightedge to identify deviations before spreading mortar.
Mortar coverage Comb mortar in one direction, back-butter larger tiles when required, and periodically lift a tile to verify coverage. Wet areas and floors generally require high coverage according to the applicable installation standard. Using small isolated adhesive spots or failing to collapse ridges beneath the tile. Weak support, voids, cracked tiles, and water-sensitive installation problems. Remove a freshly placed tile and inspect the mortar transfer on both surfaces.
Clip placement Place clips at the tile edges or corners as directed by the system instructions, keeping them fully seated beneath the tile surface. Positioning clips too far from the corner, placing them over an unsupported void, or trapping mortar around the clip. Uneven pulling force, damaged clip bases, or difficult removal. Confirm that each clip is stable and aligned before tightening.
Wedge or cap tightening Tighten by hand until adjacent tile faces are flush. Use consistent, moderate pressure rather than maximum force. Over-tightening the wedge or cap to force tiles into position. Tile displacement, chipped edges, squeezed-out mortar, or broken clips. Stop when the surfaces are aligned and the spacer remains centered in the joint.
Tile alignment Check level, plane, joint direction, and pattern regularly instead of relying only on the leveling hardware. Installing long runs without checking the layout or reference lines. Cumulative layout errors, drifting grout lines, and an uneven finished pattern. Use a straightedge, spirit level, and chalk or laser reference lines throughout the installation.
Open time and working area Spread only the amount of mortar that can be covered within its open time, which varies with product, temperature, humidity, and substrate absorption. Spreading too much mortar and attempting to level tiles after the mortar has skinned over. Poor adhesion, reduced mortar transfer, and unstable tile positioning. Perform a periodic finger-touch check and remove skinned mortar before continuing.
Spacer removal Remove reusable wedges or caps before grouting. Break disposable clips by striking them in the direction recommended by the system instructions, usually along the joint. Pulling clips upward or leaving clip fragments above the grout line. Chipped tile edges, visible plastic, and grout discoloration or failure. Inspect every joint and remove debris before applying grout.
Curing time Keep tiles undisturbed until the mortar has reached the required initial cure stated on its technical data sheet. Walking on the surface, moving tiles, or removing clips too early. Tile movement, lippage, bond loss, and disturbed joints. Follow the mortar data sheet rather than using a universal curing time.
Movement joints Preserve required perimeter and field movement joints; do not fill them with rigid grout when a flexible sealant is specified. Treating every gap as a standard grout joint. Cracked grout, tented tiles, or debonding caused by movement. Compare joint locations with the project specification and substrate conditions.
Cleaning during installation Remove mortar from tile faces and joints while it is workable, using tools that will not scratch the tile surface. Allowing mortar to harden around clips, in grout joints, or on textured tile faces. Difficult cleanup, reduced grout depth, and permanent residue. Complete a final joint and surface inspection before the mortar cures.

Note: Spacer selection, mortar coverage, movement joints, and curing requirements should always be confirmed against the tile, adhesive, substrate, and applicable installation standard.